【RSpec】リクエストスペックを✅
「ストリートナンパを始めた」という話を聞いたけど、そもそもストリート以外でナンパってすることあるのか?と気になって夜も眠れない23期酒ケジュール作成中です。
今回はrspecのリクエストスペックについて学習していきます。
リクエストスペックとは
リクエストスペックでは、api処理を担当するコントローラーが正常に動くかどうかをテストしている。
フィーチャースペックのようにブラウザをシミュレートする必要はないため、Capybaraは使わない。代わりにHTTPメソッド(get,post,delete,patch等)を使う。
GET リクエスト
GETリクエストでは正しくデータを取得した際にステータスコード200が返るか、正しく要求したデータが取得できたかをテストしている。
実際に使ってみる
今回は、alcohols_controllerのindexアクションが正常に動くか試してみる
$ rails g rspec:request alcohol
api/v1/alcohols_controller.rb
module Api
  module V1
    class AlcoholAnalyzeController < ApplicationController
      def index; end
    end
  end
end
spec/requests/alcohol_requests_spec.rb
require 'rails_helper'

RSpec.describe "Alcohols", type: :request do
  describe "get api/v1/alcohols" do
    before do
      get api_v1_alcohols_path ・・・1
      @json = JSON.parse(response.body)・・・2
    end

    it '200が返ってくる' do
      expect(response).to have_http_status(200) ・・・3
    end
  end
end
1 alcohol index pathでget通信をしている
2 1で帰ってきたJson形式のレスポンスをオベジェクト形式、もしくは値に変換している。
3 responseが200(正常)であるか確かめている
$ bundle exec rspec -fd ./spec/requests/alcohol_request_spec.rb

テストを書いたら逐一bundle exec rspec -fd spec/requests/〇〇_spec.rbを実行するのも億劫なので、guardファイルを作成しておく。
guardファイルとは
Rubyで書かれたライブラリで、ファイルやディレクトリの変更を検知し、ユーザが定義した様々なタスクを実行する事ができる。
guardを使用するためにはGemfileにguard-rspecを追加する必要がある。
gem 'guard-rspec', require: false
gem 'terminal-notifier-guard
追加後はbundleを実行し、下記コマンドでguardファイルを生成する
$ bundle exec guard init
生成されたGuardfileは以下の通りになる。
Guardfile
# A sample Guardfile
# More info at <https://github.com/guard/guard#readme>

## Uncomment and set this to only include directories you want to watch
# directories %w(app lib config test spec features) \\
#  .select{|d| Dir.exist?(d) ? d : UI.warning("Directory #{d} does not exist")}

## Note: if you are using the `directories` clause above and you are not
## watching the project directory ('.'), then you will want to move
## the Guardfile to a watched dir and symlink it back, e.g.
#
#  $ mkdir config
#  $ mv Guardfile config/
#  $ ln -s config/Guardfile .
#
# and, you'll have to watch "config/Guardfile" instead of "Guardfile"

# Note: The cmd option is now required due to the increasing number of ways
#       rspec may be run, below are examples of the most common uses.
#  * bundler: 'bundle exec rspec'
#  * bundler binstubs: 'bin/rspec'
#  * spring: 'bin/rspec' (This will use spring if running and you have
#                          installed the spring binstubs per the docs)
#  * zeus: 'zeus rspec' (requires the server to be started separately)
#  * 'just' rspec: 'rspec'

guard :rspec, cmd: "bundle exec rspec" do
  require "guard/rspec/dsl"
  dsl = Guard::RSpec::Dsl.new(self)

  # Feel free to open issues for suggestions and improvements

  # RSpec files
  rspec = dsl.rspec
  watch(rspec.spec_helper) { rspec.spec_dir }
  watch(rspec.spec_support) { rspec.spec_dir }
  watch(rspec.spec_files)

  # Ruby files
  ruby = dsl.ruby
  dsl.watch_spec_files_for(ruby.lib_files)

  # Rails files
  rails = dsl.rails(view_extensions: %w(erb haml slim))
  dsl.watch_spec_files_for(rails.app_files)
  dsl.watch_spec_files_for(rails.views)

  watch(rails.controllers) do |m|
    [
      rspec.spec.call("routing/#{m[1]}_routing"),
      rspec.spec.call("controllers/#{m[1]}_controller"),
      rspec.spec.call("acceptance/#{m[1]}")
    ]
  end

  # Rails config changes
  watch(rails.spec_helper)     { rspec.spec_dir }
  watch(rails.routes)          { "#{rspec.spec_dir}/routing" }
  watch(rails.app_controller)  { "#{rspec.spec_dir}/controllers" }

  # Capybara features specs
  watch(rails.view_dirs)     { |m| rspec.spec.call("features/#{m[1]}") }
  watch(rails.layouts)       { |m| rspec.spec.call("features/#{m[1]}") }

  # Turnip features and steps
  watch(%r{^spec/acceptance/(.+)\\.feature$})
  watch(%r{^spec/acceptance/steps/(.+)_steps\\.rb$}) do |m|
    Dir[File.join("**/#{m[1]}.feature")][0] || "spec/acceptance"
  end
end
Guardを起動する。
$ bundle exec guard
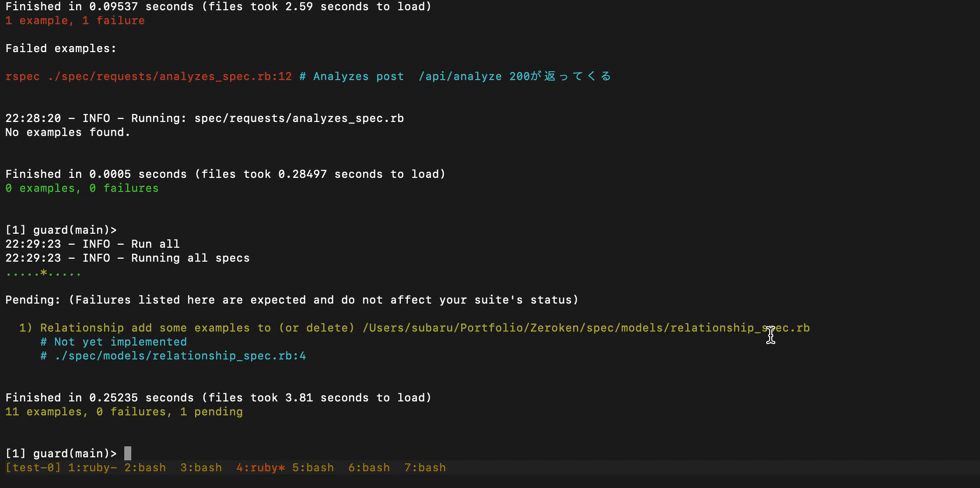
スペックファイルを編集すると逐一変更を検知、実行してくれる。下記の通り
ざっくりスペックの種類をおさらい
システムスペック
アプリの統合テストを行うRSpec
個人開発において、アプリ開発の終盤に書くことが推奨される。なぜなら、UIの変化が激しいから。工数が多いため、モデルスペックとリクエストスペックだけで終わらせる場合もある。
モデルスペック
ActiveModelが正常に動くかをテストするRSpec
コントローラースペック
Controllerが正常に動くかをテストするRSpec
リクエストスペック
【動画付き】Railsチュートリアルの統合テスト(integration test)は、RSpecのリクエストスペックに置き換えるのがラクです - Qiita